
----------------------------------------------------------------------------------------------------------------------------
Hi there again!! After such a wonderful response to my tutorial "How To Tranform A Digi Into Sepia Or GreyTones Using Microsoft Word 2010" I posted the other day, I had quite a few questions asked about using other programs, such as Photoshop... so here it goes... a tutorial for Photoshop CS2
Now I know Photoshop CS2 is an old version but since I'm working with quite basic things I'm going to assume the steps will be similar in each version, however feel free to drop me a line if I'm wrong!
Regarding Photoshop... Adobe Photoshop is basically a program developed for the manipulation of photos. It is professional imaging software and as such there are drawbacks to this program, such as there is no ONE STEP MAGIC BUTTON!!! So unlike my first tutorial, where you just had to know where to look and some instant options became available to you through Microsoft Word that had inbuilt programming into it, doing ALL the work for you, this program has little of these features.
However!!! If you are willing to put the time and energy into learning how to use this program, the things you CAN do with it are AMAZING!!! because of there are so many options and these options are all customisable and nothing is limited by ONE STEP MAGIC BUTTONS!!! I personally use this program for all of my digi merging, which it is a godsend for, giving me amazing results for the time I put into it. Like any program, once you know the steps, they are easy to replicate.
Now I did have this tutorial combined liked my last with the transforming your digi into sepia as well... but after spending the morning screenshotting it all, and counting it all up!! it's a rather long process combined. Also, unlike my previous tute, these two processes are complete different using this program and require you to alter the digi, so I'll start with greytones... and you can move onto "How to Transform A Digi Into Sepia (And Other Rainbow Colours!!) Using Photoshop CS2) when you have gotten these steps done.
For those of you without Photoshop and wanting to use it, DON'T go out buying the latest version which will literally cost you $700-$1500!!! Adobe have released their original version CS2 (the one I'm using in this tute) as freeware!!! and you can download it HERE!!! This is where I got my copy from, it is a legitimate copy, with the keycode available on the same page to activate the program.
Once again, I will write this tutorial from the point of view that you have NEVER used the program before. This way any newbies can have a crack at it. Feel free to bounce ahead if you know the steps!!!
Ok then.. Happy Learning!!!
Tutorial: How To Transform A Digi Into Greytones Using Photoshop CS2
When you start Photoshop this is how it should look!!

Along the top of the screen is the Main Tabs! To open your digi, you will need to click on File, and then Open, as shown below in the screenshot.

This will open up your computer files where you will access your neatly arranged, alphabetised digi files!!! Pft!! LOL :)
For todays tutorial I'll once again be using our friendly little Gingerbread Man digi designed by Mo Manning which is available for free HERE!! I just love him cause he looks like he's waving at me.. HELLO LITTLE GINGERBREAD MAN!!! *waves at my computer screen* Anyhooo!!!
Select your chosen digi and click on Open!

This is how your screen should look!!! If not.. um... Gremlins have infected your computer and you may want to run away screaming now!!!! LOL... or just go back a few steps to make sure everything was followed correctly. :)

Now this is REALLY IMPORTANT!!! We are about to make changes to your little dude! and we really don't want to mistakenly save over your bought digi so we are going to save a copy and rename him... or her!!
To do this, go to the File Tab at the top of your screen again, and click on 'Save As'.

Now you can choose to rename your digi whatever you want, but for ease or use, it is best to rename it something that reflects the changes you are about to make. In our tutorial, we are going to change the digi to greyscale and so if you place your cursor and click in the box with the filename, you can change the name there. I have added greyscale to the original name. you do not need to change any other preferences!! Click 'Save'
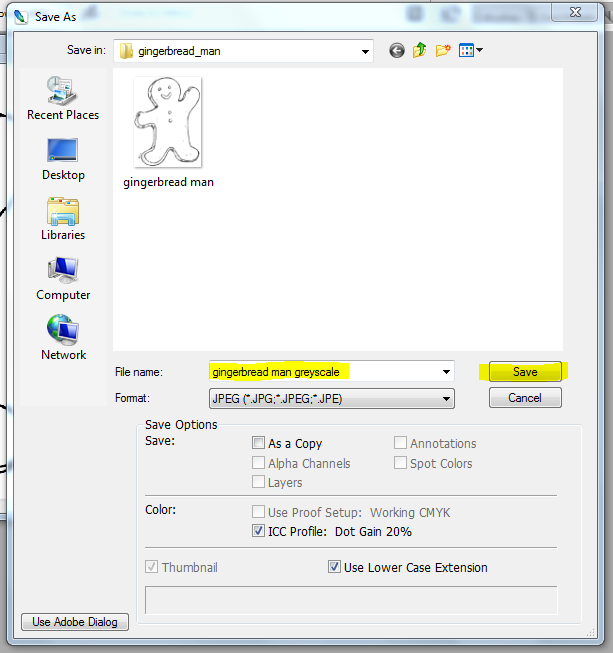
A second box will now open up asking for JPEG Options. You want to make sure that the 'Quality' is set for maximum. you can do this by using the drop down box as highlighted, or by using the slider and moving it to largest file. This allows the file to be saved in the most amount of information and DETAIL that is available. We want that, because we don't want to go to all of this work, to find our digi looking cruddy at the end!!! Click 'OK'

Your digi should now have your new name shown here, as highlighted below. Now whatever changes we make, if we press save, they will be saved to this digi and NOT your original. HAPPY DAYS!!!

Now that our original digis are all safe and sound!!! we can go back to formatting.
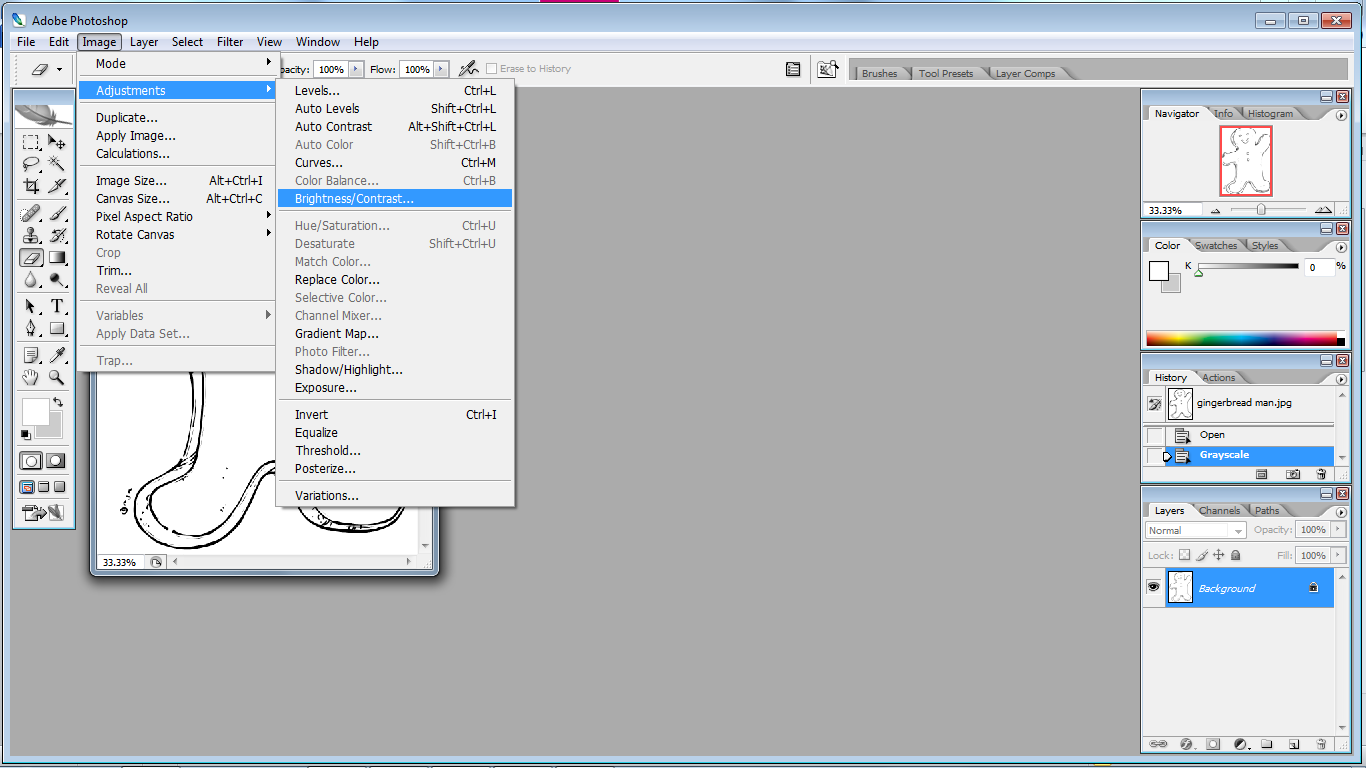
This is where you get to have fun. As I previously mentioned as the start, there is no ONE STEP MAGIC BUTTON!! This is fully customisable to suit you. So there are two methods of changing these values. 1: using the slider 2: using the boxes and inserting values. the way I like to use them is play around with the sliders until you get a grey you are happy with, then either write down in a your art journal the values or take a screen shot using the PRTSC button on your keyboard (or some variation of it) and save the image for later reference. When you go to do your next digi like this, insert these values you have recorder into the boxes. This will allow you to customise a specific grey for you. Now it might take a little bit of time fiddling with the program and printing out different digi's to find the exact grey you like. This is a downside to the no MAGIC BUTTON! but on the upside, you might like or need certain greys slightly darker of lighter depending on what you are printing on, like Kraft paper for example! So have a play and find your settings and RECORD THEM SOMEWHERE!
....And click 'Ok' ... Teehee!!

Now I don't have a screen shot of this you should save your work!! You have already changed it's name, so all you have to do is go to File, and under file press on 'Save'. It should just do it with no boxes opening or anything!
Onto printing!! Once again, go to File, and right down the bottom is 'Print with Preview' select that.

This is the screen it will open up! There are two things we want to do on this page. We want to maximise the usage of our paper, by moving the image out of the center and into a corner, and we want to be able to resize our image for printing.

First we will look at the images position on the page. The section highlighted below is the control for image positioning. If you want to have your image directly in the center of the page leave as is! If not you need to UNTICK the 'Center Image' box. This will allow you to move the image around. Now once again, you can do this two ways, by adding in values or by dragging the previewed image around with your mouse.
If you new the exact location by measurement you needed the image to be on a page you would enter these into the values boxes, and you can change the measurement type to inches, mm ect by the drop down boxes beside them if needed. The picture will automatically move to that location is the preview pane.
If however the exact measurement is not needed, it's just as easy to click on the image in the preview pane and drag it to the position you want it.

You can also choose to type 0, 0 into the value boxes and it will place it in the top left hand corner!

1: Scale will be set at 100% when you open this print section. You can adjust this by typing in values to any % and the image will get bigger or smaller. 50% will be half the size, 200% will be twice as big.
2: 'Scale to Fit Media' - pressing this box the computer will automatically resize your image keeping it's original proportions to the biggest size it can be to fit the page.
3: Values Box, Height and Width - once again you can add in specific measurements if you have some. You can change the measurements from cm, to inches, to mm. The chain link symbol next to these selections indicate that they are all LOCKED together. when you change one, they will all change to compensate and keep the set proportions of the image!
4. LASTLY!! 'Show Bounding Box' - if this is not ticked you can tick it!! if you want to freely transform the size of your image then place your click and drag on one of the four corners of the preview image! as highlighted in yellow.
Now you can press 'Print'. Pressing Print will bring up your own printers standard print box, which you will hopefully be familiar with. To make sure this prints in greyscale (it should) but you can always select "Greyscale Printing" on your printer page options. :)

Well I hope that wasn't too much information overload!! As I expressed, Photoshop isn't as easy a program to to use (or explain LOL) as Microsoft Word, but once you have done it, it's pretty easy to replicate!
If there is anything in the tute that does not make sense, feel free to comment below and I'll fix it. It's only my second tutorial and I'm still learning!! and on that note, my tummy is grumbling rather loudly!! as i seemed to have worked through lunch. :)
So Have fun formatting and I'll get the next tutorial up after I have given my whinging shoulder a bit of a break from typing. :)
Xo
No comments:
Post a Comment
HELLO!!! *waves enthusiastically* Thank you for stopping by and taking the time to comment!! I really appreciate it, and read each and everyone of them.. It is what gets me out of bed in the mornings!! I swear!!! :0) Feel free to leave me questions if you have any and I will be sure to get back to you as soon as possible!! :) Xo