Friday, November 28, 2014

TUTORIAL! Fairy Christmas "Northern Lights" Background

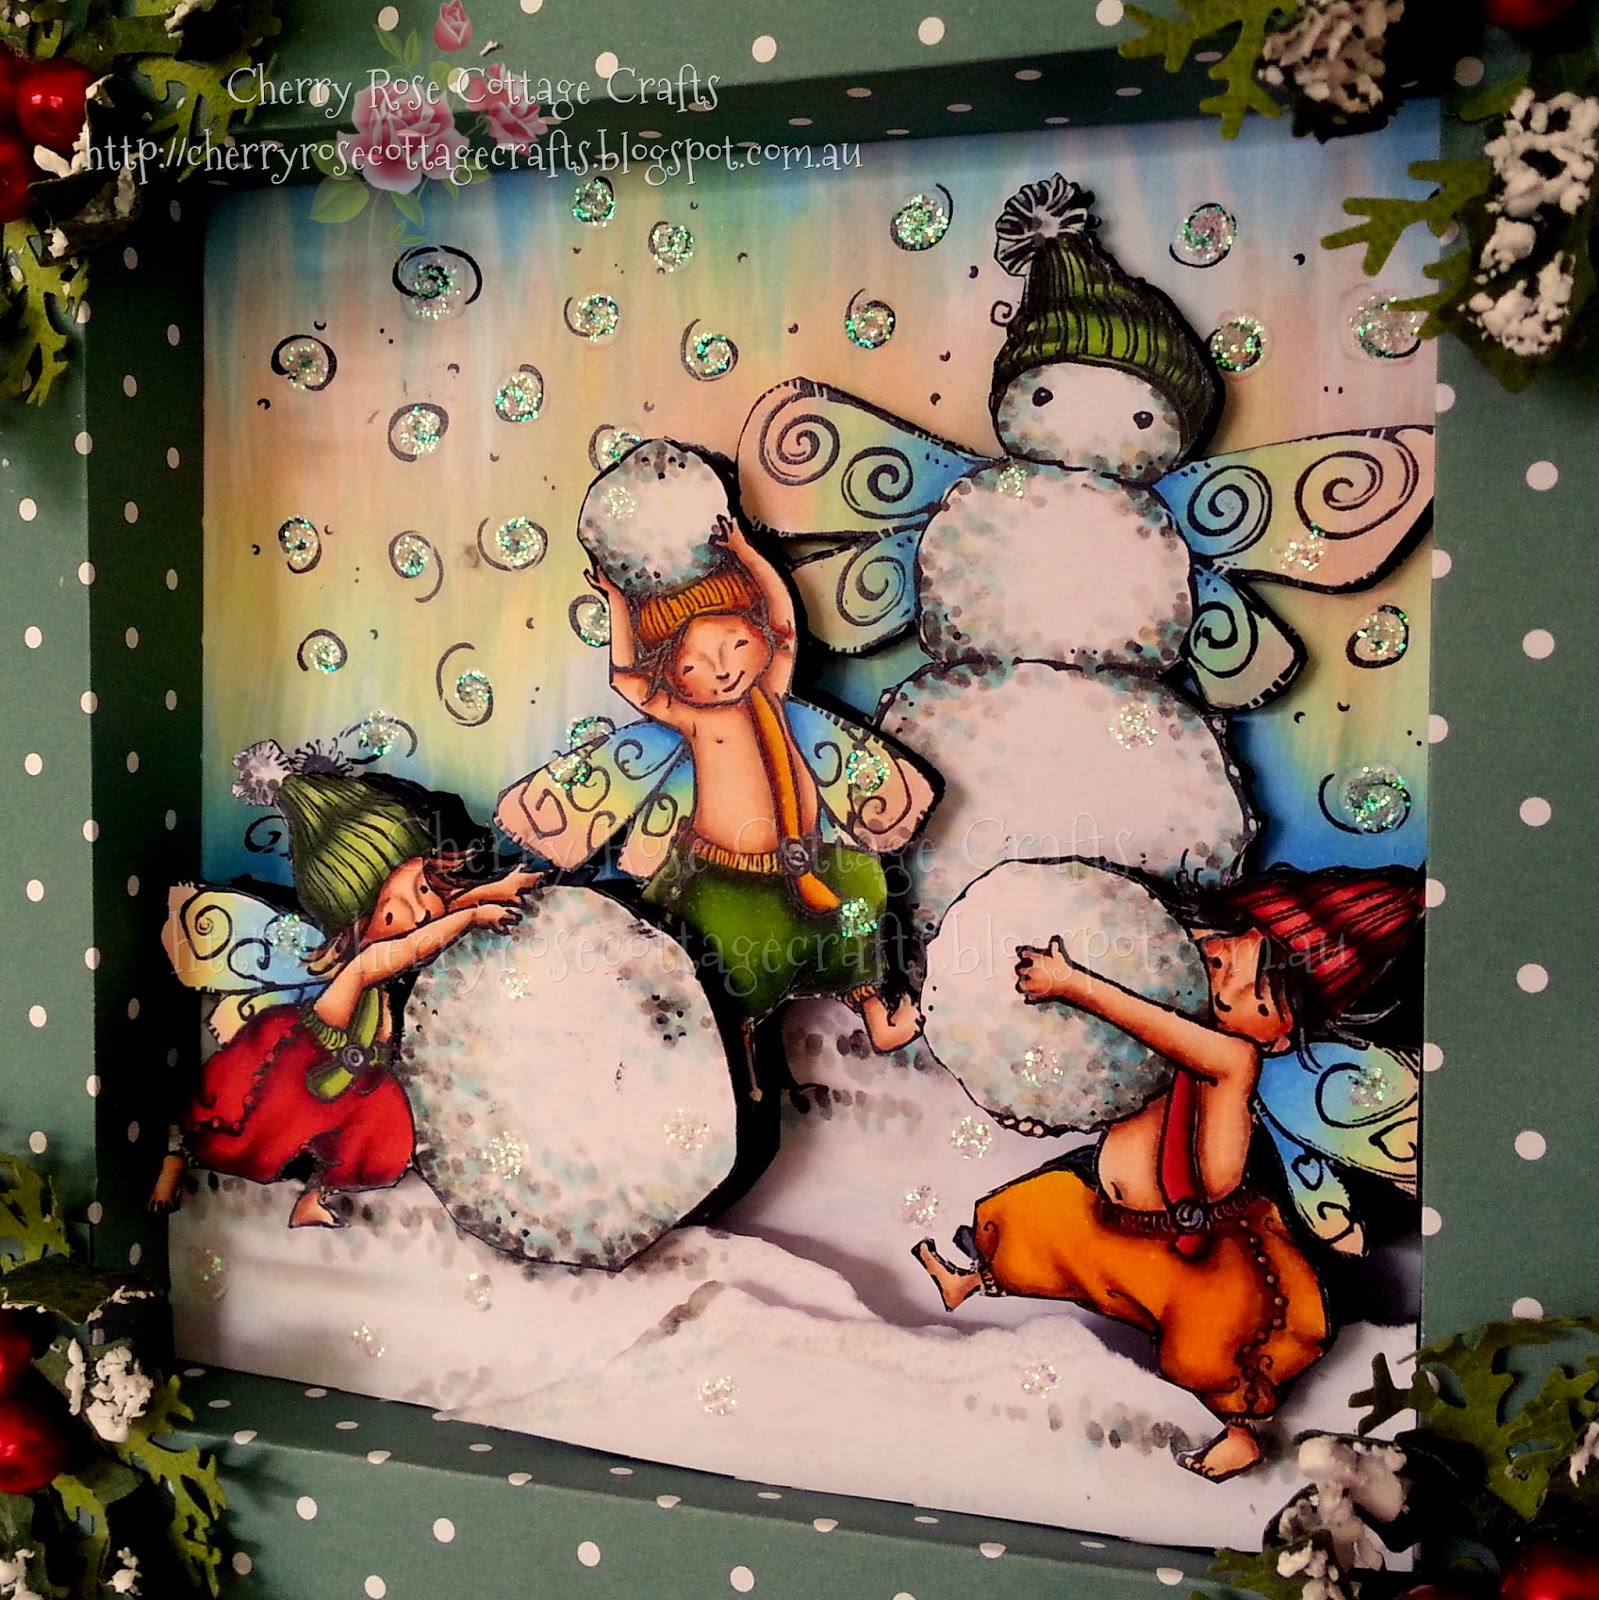
Hi there! I thought I'd quickly share with you all the way in which I put together the background for my latest Shadow Box Creation the "Fairy Christmas".

Basically I just went and had some fun with my Copics!! but was smart enough to take photos along the way!! LOL. So if you like the effect, it's pretty simple to do!! Feel free to use this tutorial to create your own unique works and if you happen to give a little credit/linking to my blog when you  post your creations, that would truly be LOVELY of you!!! ;) 

So I started with a gorgeous scene of Snowmen Fairies I merged together from the "Fairy Christmas" set and the coordinating "Snowman Fairy" all available on Mo Digital Pencil.  I used Adobe Photoshop CS2 to do this and if your interested in using this program and learning how to do merging on scenes the program is available legally as freeware HERE and I originally learnt how to merge following along with this wonderful You Tube Video!

You'll Need the Following Copics:
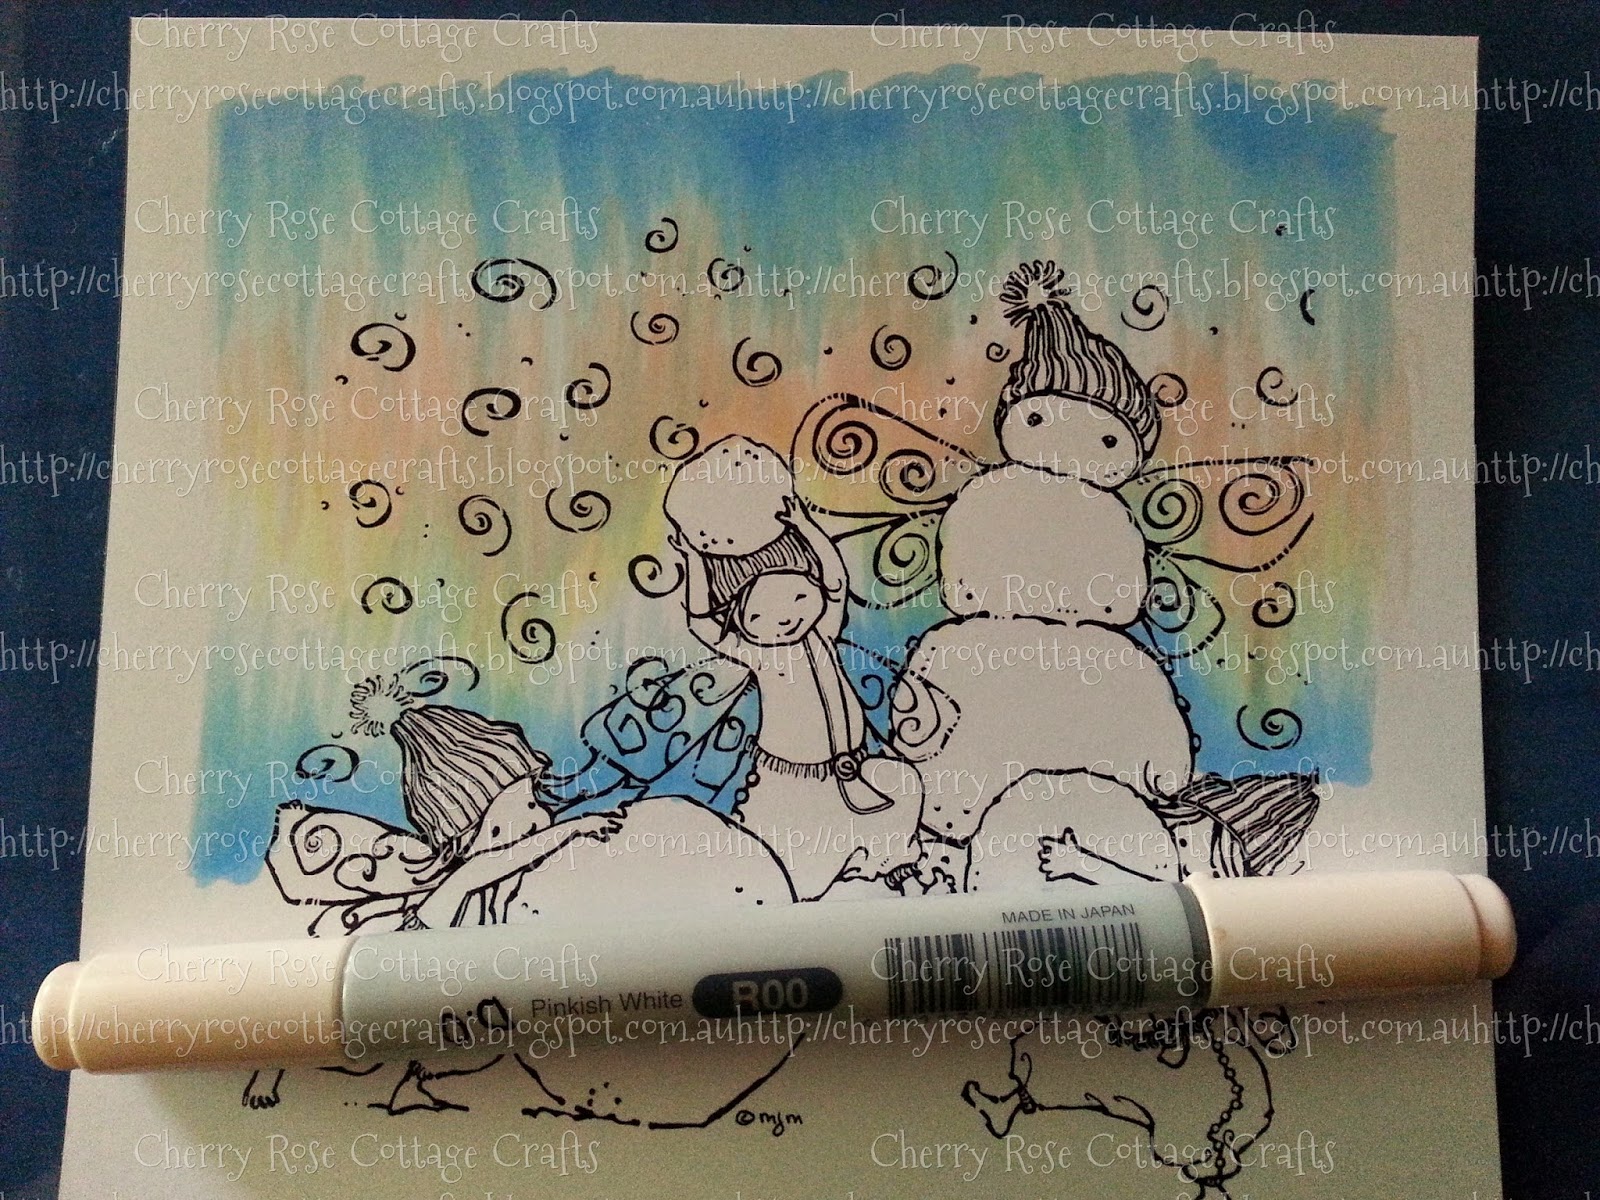
R00, Y00, B12 + B00

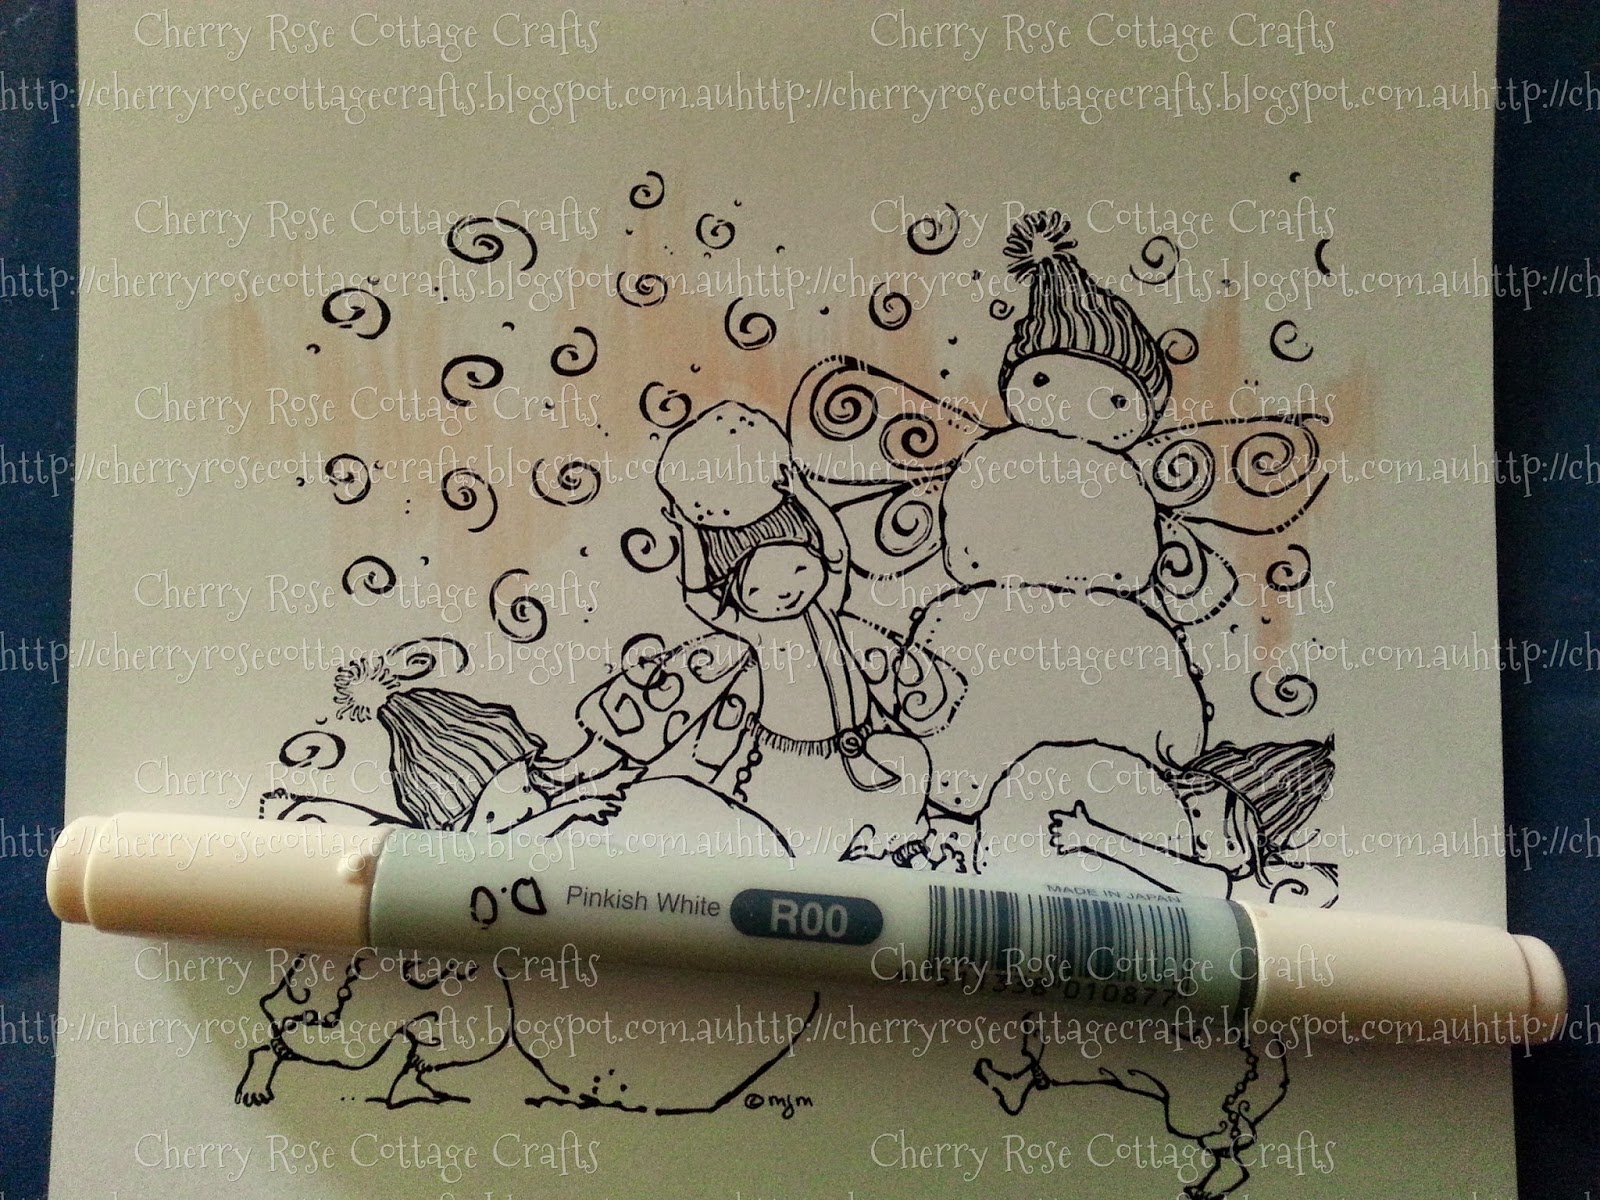
Start by randomly flicking R00 across your page. try thinking about how Northern lights kind of flicker across the sky. The more random the better, and really try and flick out the edges so that they are not solid . I do this by starting my stroke in the middle of the colour band and flicking outwards towards the edges in whatever direction I'm going so the tail of the flick ends up being lighter then where I started, much like a tick!

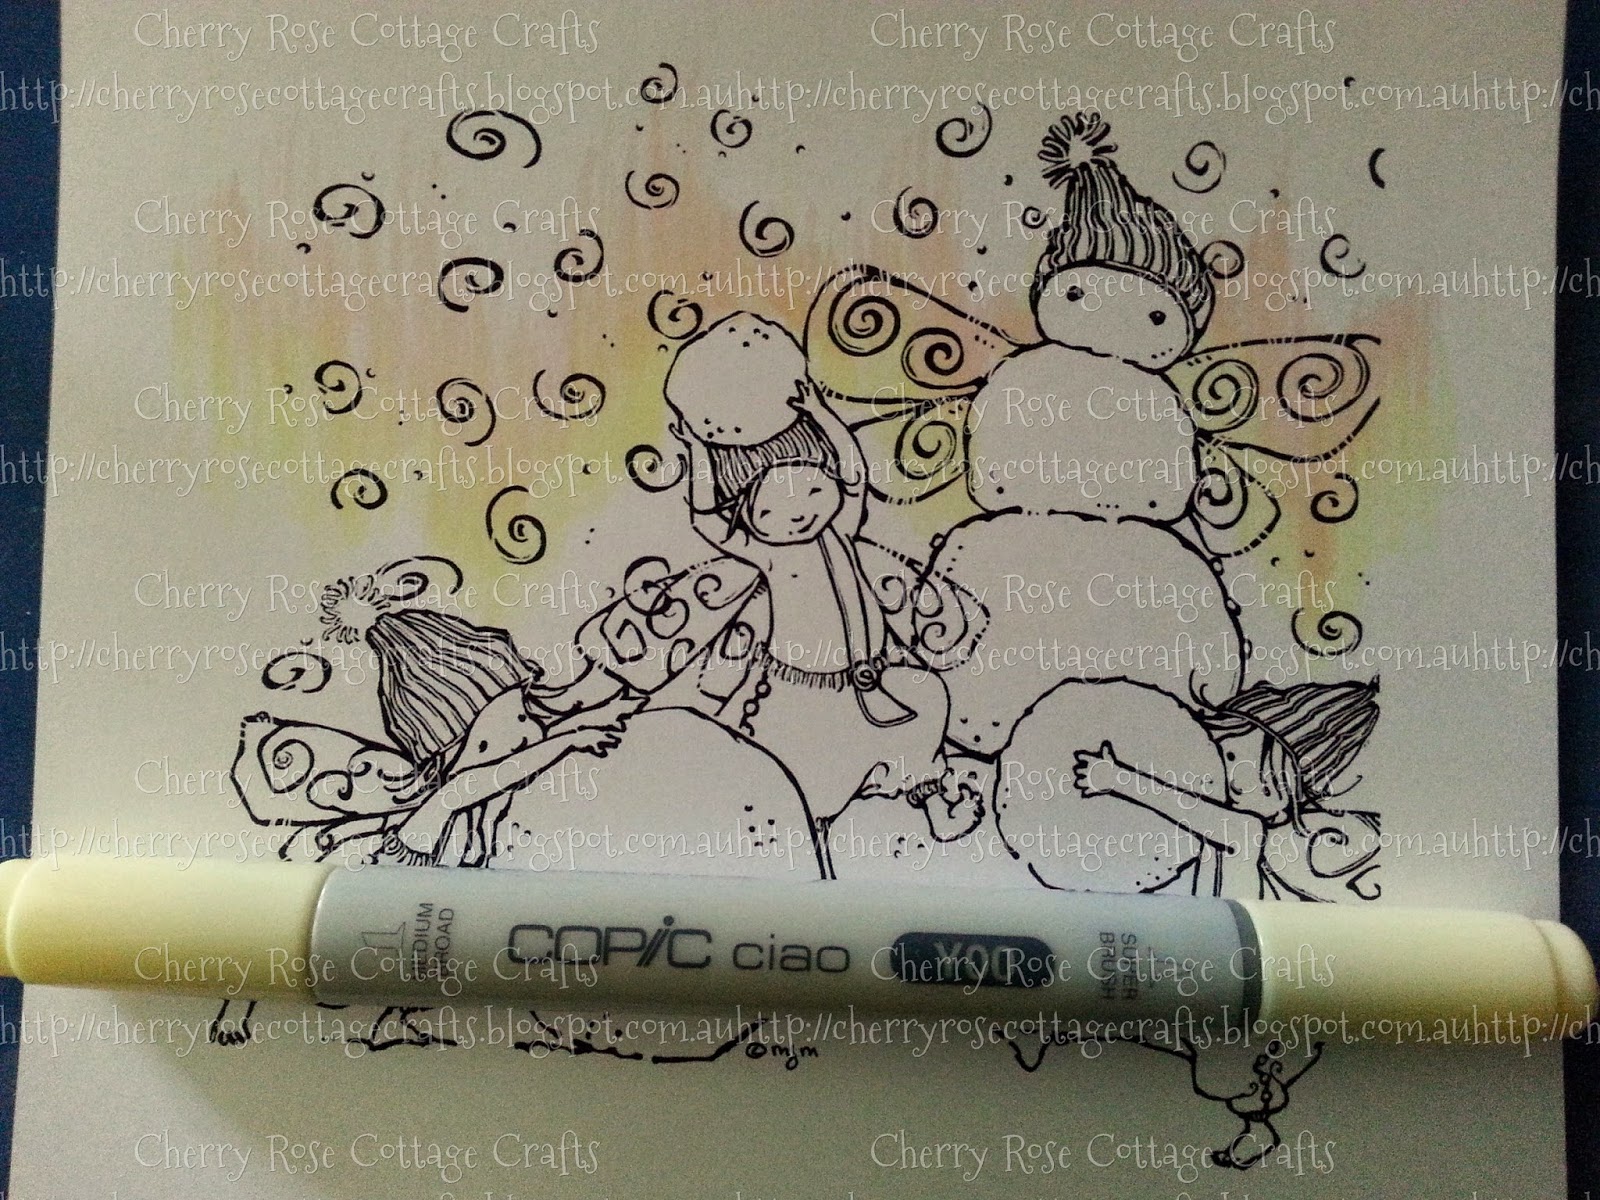
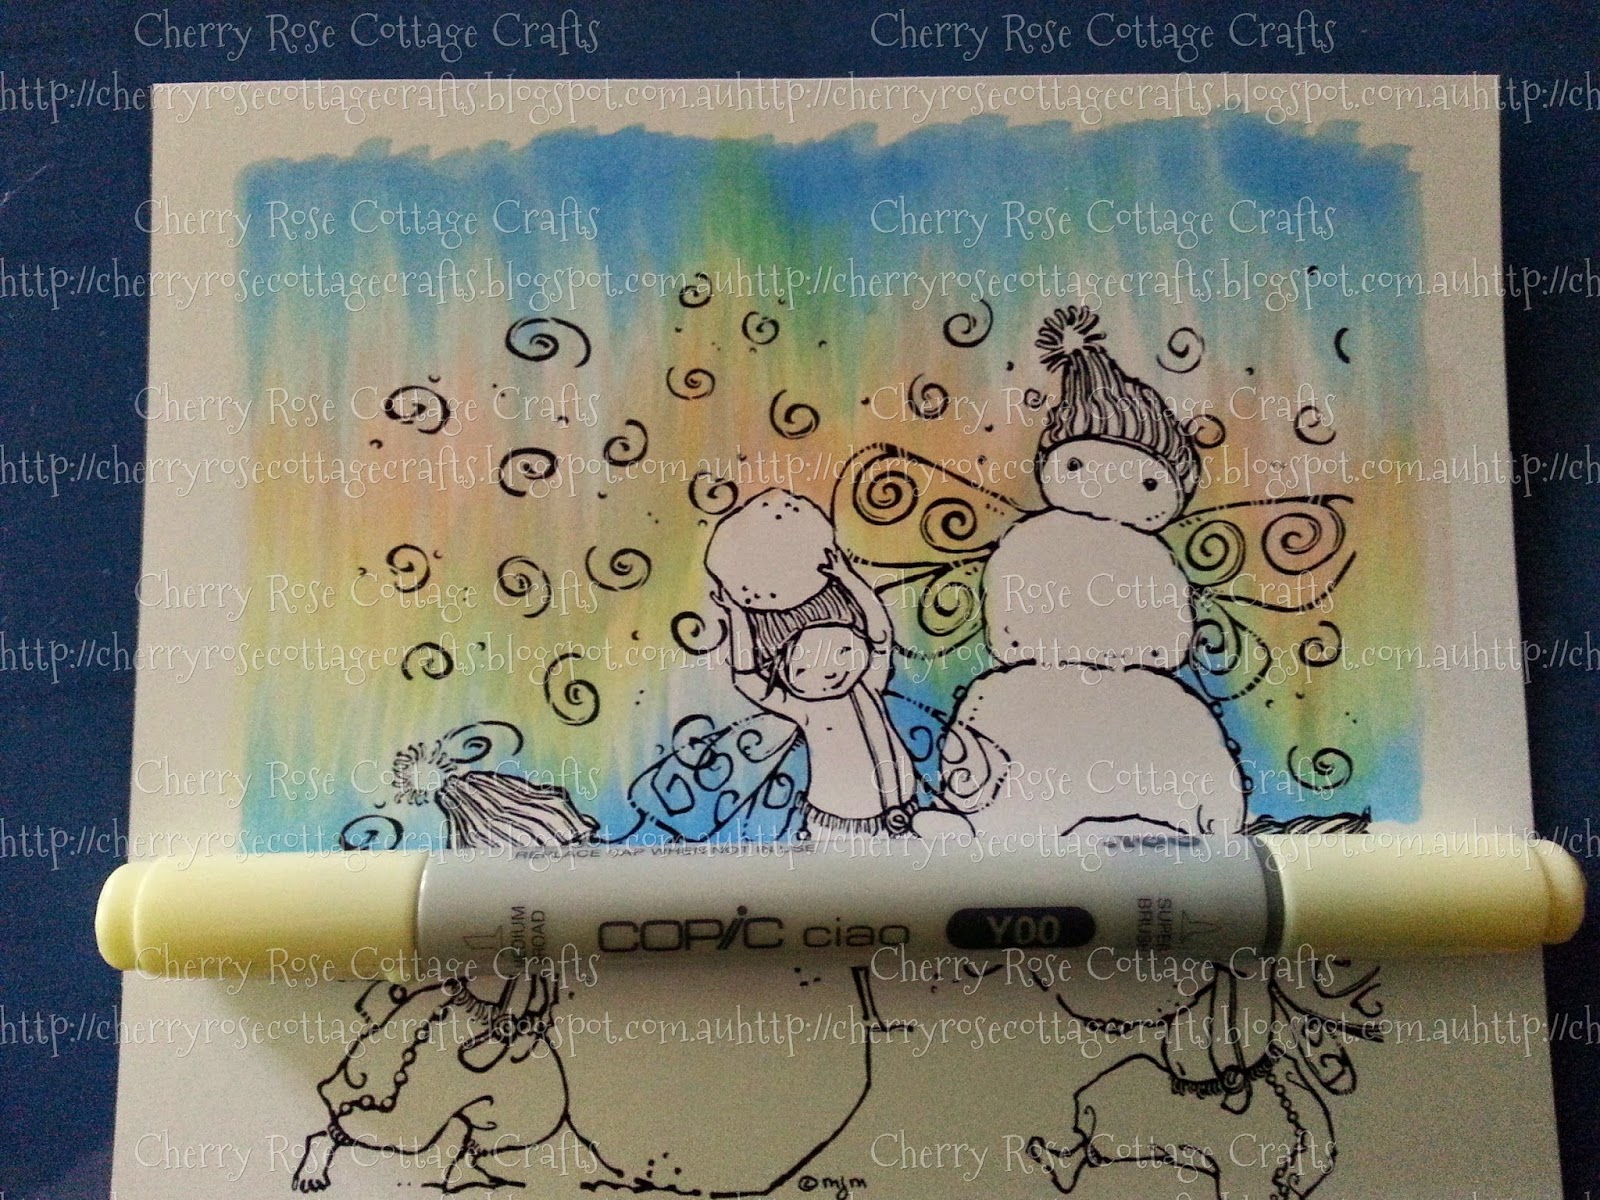
Next add the Y00. I choose to add it towards the bottom of my R00, but I also overlapped the R00 slightly, this overlapping is important because it gives you the mixed tones of orange between the Yellow and Pink. 
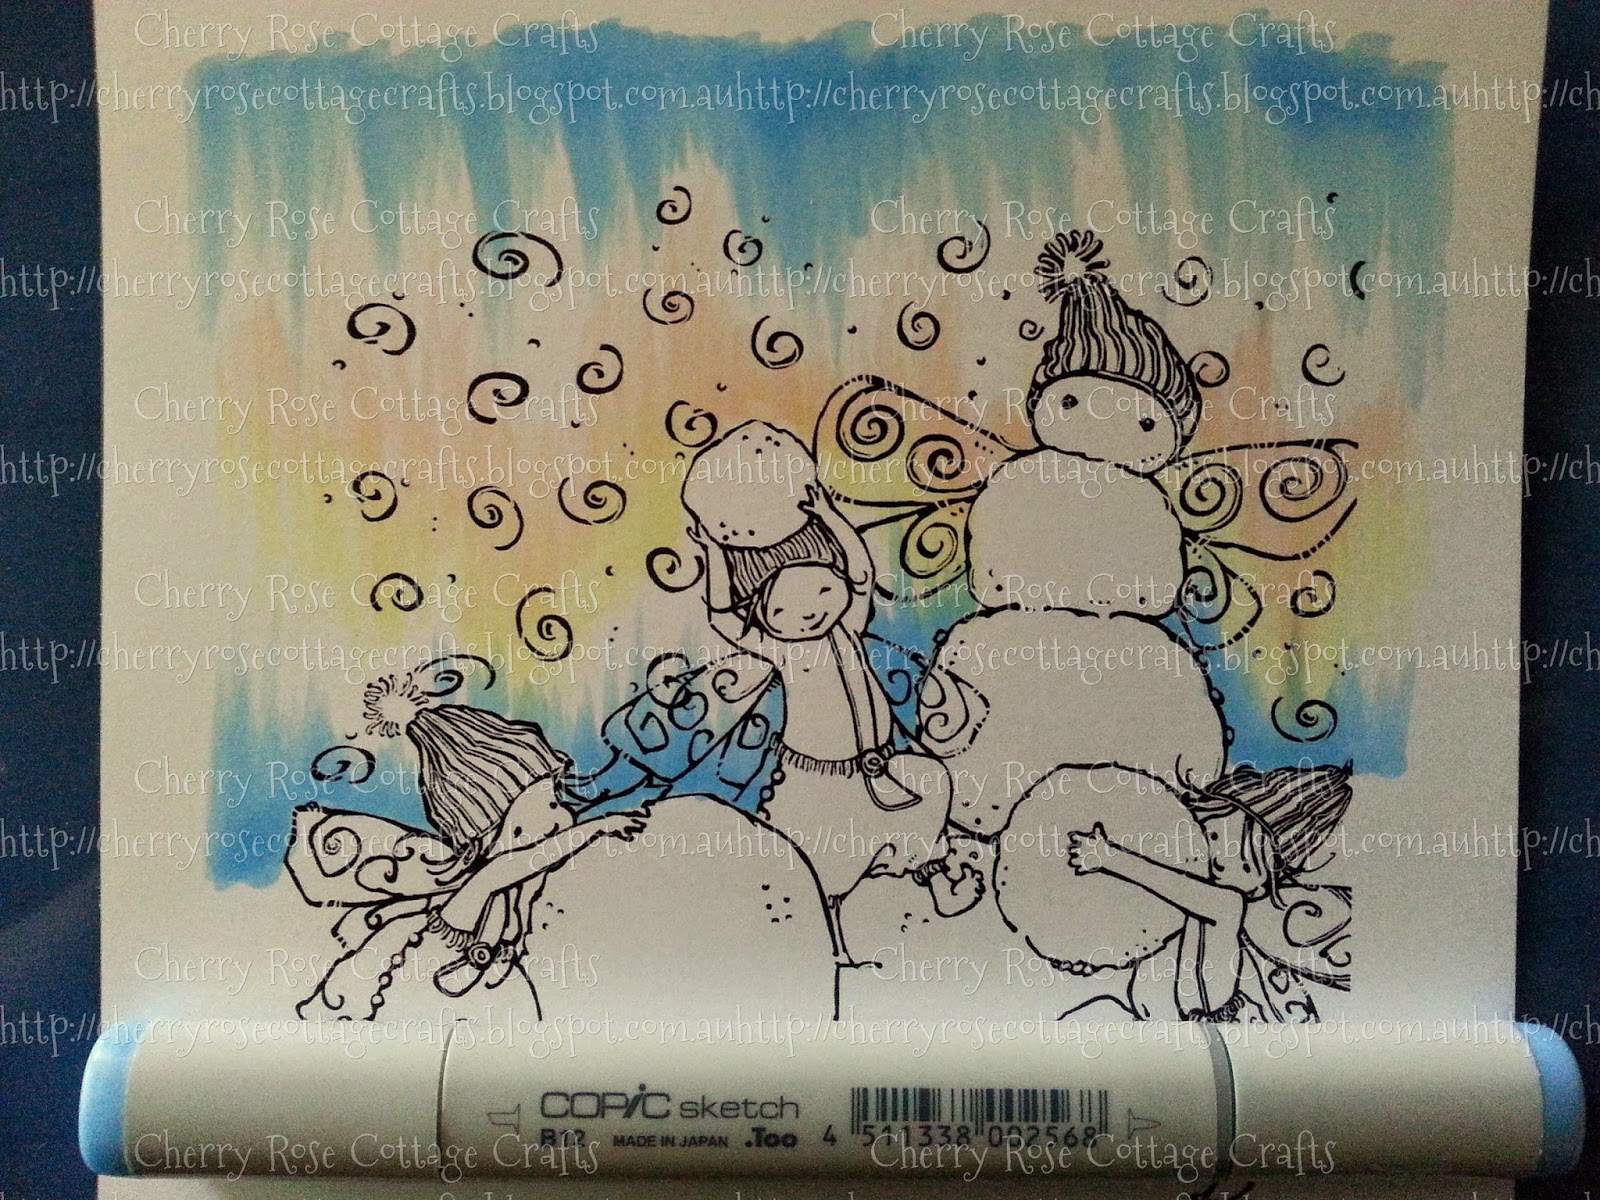
 Now taking your B12, flick in from the outer edges, tops and bottoms. This will form your sky line, so make sure that it forms a solid colour line across the top and bottom, but then to allow for effect of the Northern Lights, you can randomly drop the colour down as seen below. Make sure your Marker colour is strongest this time from the outer, and lightest towards the inner this time.. so Flick TOWARDS the center, not away! Leave a gap of white because you have one more blue, just lighter.
 Taking your B00 now flick over the top of the B12 into the white and occasionally into the R00 and UP from the bottom into the Y00. 
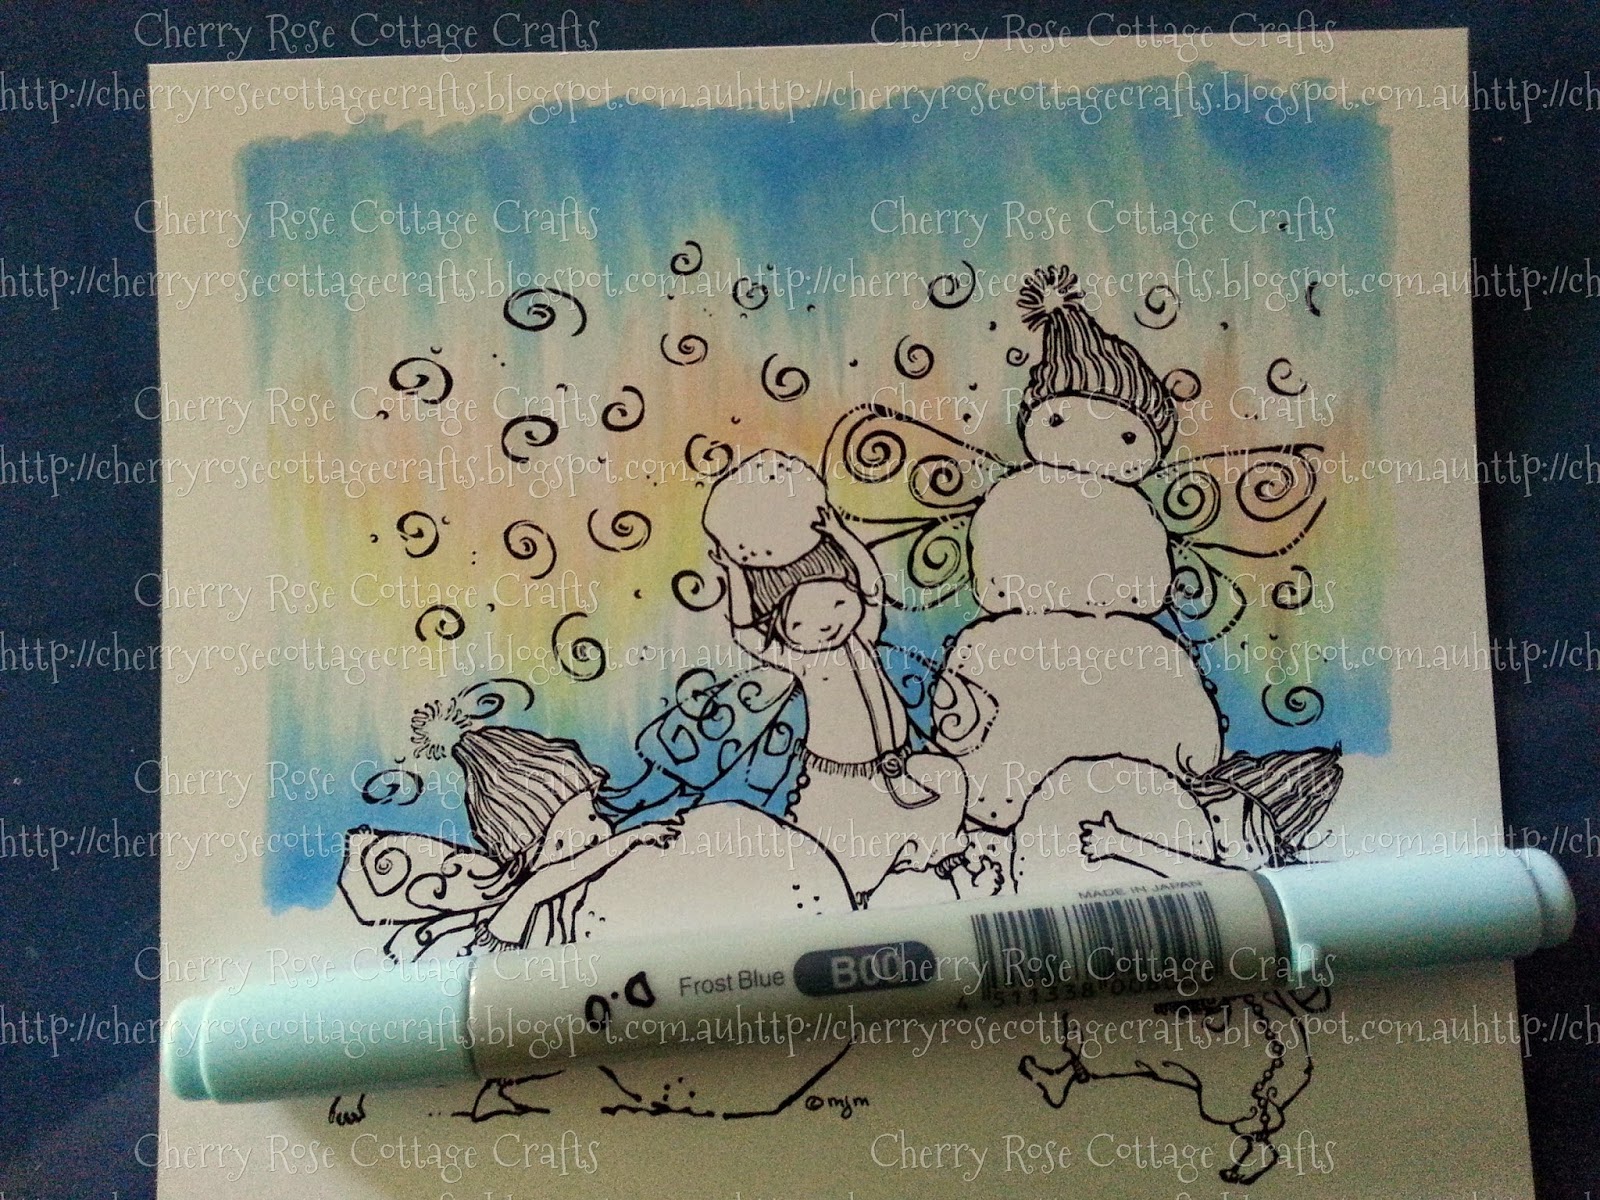
 Going back with the R00, flick back over your background, darkening your "Lights" until you are satisfied with the colour.
 Lastly, taking the Y00, Colour back over the top. This last time you can take the route of your colour slightly different then the originally placed Y00, more randomly and crosswise to the R00, also extending up and into the B12 a little. This allow the Yellow to blend with the colours underneath creating subtle elements of orange and green through your background, which is more in line with the real Northern Lights.
The below image has been cropped To only use part of the sky background, but I think it looks quite effective. 

Just remember to have FUN!!. Try out different colours and just see what happens!

Happy Crafting!! Xo

A Fairy Christmas with Mo Manning!

HO HO HO!!! Fairy Christmas!!! *wink*...  Are we all on Santa's Naughty or Nice list!!! LOL... because the lovely Mo has put on her magical Santa hat, woven her Christmas FAIRY magic... and created the most marvelous, beautiful little set of Christmas Fairies you have EVER SEEN called "Fairy Christmas"
http://www.mosdigitalpencil.com/fairy-christmas/
The set includes, the three absolutely scrumptious Christmas snow Fairies, and two sentiments which I just think are totally gorgeous... 

And to celebrate the launch of this little set of stamps, Mo is kindly playing Mrs Claus for 24hrs, and offering you a beautiful coordinating "Fairy Snowman" as a gift to you for FREE! for being the wonderful people that you are!! :)
http://www.mosdigitalpencil.com/fairy-snowman/
Now obviously you'll probably be wondering what you can do with this gorgeous "Fairy Snowman" and "Fairy Christmas" set. Well this fortnight over at Mo's Challenge Blog it JUST HAPPENS to be ALL ABOUT SNOW!! what do you know!!.. so you will get plenty of chances to use this wonderful digi in this next card challenge. 

Now Mo thought you might like some inspiration for how you can use these beautiful stamps, so this fortnight all person on the Design Team was given these stamps and told "Go forth and make something"... teehee.. but with a less God like quality and more.. Mo, saying.. go have fun!! So we have all just had a ball coming up with whatever we wanted and I think you will be pleasantly surprised by how different each card/creation came out. I know we all were. So onto my Creation!

Today I have another Shadow Box!! Yes yes yes.. still obsessed with my new Scor Pal.. not over the Shadow boxes yet. LOL.. anyhoo. will just jump right in and show you pictures cause I just "went for it" with my Copics and had a ball... Sorry guys, but I can't give my Copic colours for this.. got lost half way through "in the moment". 

Card Ingredients: 
Digital Images: "Fairy Christmas" Stamp Set & "Fairy Snowman" 24hr Freebie by Mo Manning.

I have made this scene by merging the "Fairy Christmas"  fairies with the "Fairy Snowman" using Adobe Photoshop CS2 (free version available here LEGALLY). To learn to merge I followed this basic you tube video...  I required more "Snow" in the background so I copied this from the Snowman digi and pasted them at various angels and sizes to increase the background for my scene.

I've done a really basic Paper tole with these little guys to create a 3D appearance in the Shadow Box.  If you would like to see how I do my Paper tole You can view one of my Tutorials HERE!

Shadow Box Instructions Available From HERE
"Holly" and "Pine branch" Punch by Sullivan from Lincraft   
Red Beads Also From Lincraft. 

Stryo-Snow MADE BY ME!! Tutorial coming next week!!! 

 Well I hope you have enjoyed my card. Thank you for popping over to take a look. I'm really looking forward to seeing what all you wonderful people do with your free "Fairy Snowman" digi's, and look forward to whatever cards you enter into this fortnights SNOW CHALLENGE!! over at Mo's Challenge Blog... 

So HO HO HO.. 

FAIRY CHRISTMAS!!!

*wink*

I'd like to enter this Shadow Box into the following challenges:
CHALLENGE #75 - "SNOW! SNOW! SNOW! [or USE ALL WHITE]"
 Challenge #99 Anything Goes w/optional use Subway Art 
(My Wall Hanger and I were WINNERS!! YAY!!!)


Friday, November 14, 2014

Tedde Bear Hospital!

Over the past few months I have drooled over the creations I have seen on the Internet made with the ScorPal... all of those fancy folded cards, envelopes to match, folding boxes, and EXPLODING BOXES!! I mean the possibilities are ENDLESS!!! and so I bit the bullet and I bought myself one for my birthday present. and Oh Oh OH!!! HOW I LOVE THEE... LET ME COUNT THE WAYS!!! 1, 1000, 2, 1000 3, 1000... (ok.. anyone from the 80's will hopefully get the Roger Rabbit references) lol... and of course, do I ever creep forth gingerly, taking things easy with my new toys until I know what I'm doing and have gained valuable knowledge and experience.. NAH!!! I get go running in, skidding sideways, taking out furniture and decorations on my way... and hope it all turns out in the end! LOL.... 

So of course, I thought why not utilise my ScorPal to make a SHADOWBOX for this weeks DT Challenge over at Mo's Digital Pencil Challenge Blog. ;)

This weeks challenge theme is "Thank You" and I figured I have not put together a merged scene in a little while, and anyone who has visited Mo's Digital Pencil Shop knows how well Mo's digital stamp lend themselves to making little scenes when merged.. I just LOVE to do it. So figured with my ScorPal, My Shadow Box Instructions and Mo's Digital Images I'm sure I could come up with something special...
A Tedde Bear Hospital for instance!
  I scoured the blessed all knowledgeable source of information... "Pinterest" LOL.. and found the exact instructions for what I was looking for. A 6inch x 6inch Shadow box... Now this turned out to be a super awesome little box that I will use again and again, I LOVE it that much, and so if your looking for a great Shadowbox, you can find these instructions HERE.
(Left) "Love Ya"  (Center) "Nurse" (Right) "Broked"
 
"Love Ya" is just adorable, squishing her bear. In this scene it made it seem like this one had JUST been "healed". LOL.. This digi can be purchased HERE
 
"Nurse" is what brought this whole scene together. She is adorable with her little uniform, and her needle isn't half as scary with a teddy bear in her arms. She can be purchased HERE. 
For myself "Broked" is what completed this little scene. This sad little face with her broken teddy is just so full of emotion. But we know that a nurse is just a moment away, and a happy little girl like "Love ya" will take her place shortly. :) You can purchase "Broked" HERE, or other Boys and Girls in the "Broked" series HERE

Card Ingredients:


Digital Images:
Mo's Digital Pencil: "Love Ya", "Nurse", "Broked"

Copics:
Background:W0,W1,W3,W5,W7, C1,C3, C5,C7

Love Ya
  • Skin: E000, E00, E11, E21, E04, R20
  • Hair: Y21, Y26, YR24, E25
  • Cardigan:B60, BV31, BV23, B12, B24
  • Dress: B12, B24, B28, B29, B99
  • Pants: V01, V04, V06, V09
  • Teddy: W1, W3, W5, W7
Nurse
  • Skin: E000, E00, E11, E21, E04, R20
  • Hair: YR14, YR18, E08, E18
  • Uniform: R00, R11, E95, RV34
  • Coat/Hat:B60, BV31, BV23, R24, R27
  • Shoes/ Stethoscope/Needle :C0, C1, C3, C5
  • Teddy:YR21, YR23, YR24, E35, E37, RV11, RV13, RV14
Broked
  • Skin: E000, E00, E11, E21, E04, R20
  • Hair:YR21, YR14, YR07, R08
  • PJ:G12, G14, G07, BG07, E95
  • Teddy :E21, E15, E18, E25, E29, R27, G28, C0, C3, C5
Shadow Box Instructions From HERE
Paper Design "Rose Garden" 12" x12" Premium Paper Pad First Edition Papers. Purchased from Lincraft, but can purchase from UK HERE
"Holly" and "Pine branch" Punch by Sullivan from Lincraft
Roses from Local $2 shop.

Before I go, I'd like to give a big thank you to my lovely friend and Copics teacher Alyce From Kit & Clowder. Every time I do another card with Copics I see I'm improving with leaps and bounds and it is all because of her and her wonderful instruction and teachings. So thank you. I'd also like to add that She has just released a wonderful new Animal Class that is just AMAZING!!! it's HUGE.. with over 40 instructional videos and cropped images for you to colour and learn with. So if you are interested in learning how to colour animals with your copics (or anything else with copics) head over to Kit and Clowder and take a look at there classes or head over to there Facebook Page and have a look at what everyone is doing on there. you will be amazed. I'll be using this image as my BEFORE picture for the Animal class I have just purchased. We learn to colour Teddies!! in the class, so I'll be interested to see what my teddies will look like after I start!

Thanks for stopping by. I look forward to seeing your beautiful "Thank You" cards in this fortnights challenge over at Mo's Digital Challenge Blog!!!

Happy Crafting!!

Friday, November 7, 2014

Up Up and Away! A Birthday Card For My Dad!

Just a quick post to share the photo's of the birthday card I made for my dad. I was unwell that week, so I could not put the effort into colouring or painting I normally would, so I had to think on my feet and make a Hot Air Ballooning card that without the digital image I had purchased. What I created has ended up being a crowd favorite! LOL.. and I love it to bits!


Thanks for popping by and having a look!
Happy Crafting 
HUGS!
Amanda